
Transparent LED Display for Retail Windows: Installation, Content Strategy & ROI Guide
Reading time: ~14 min | Best for: Retail brand managers, visual merchandising directors, store designers, and AV integrators who have decided to install transparent LED in a storefront window and now need to plan the installation, content, and measure the return.
A brand director at a European footwear chain told us last quarter that their transparent LED window installation had been, in her words, “the best display we never used.” The hardware was perfect — 5,000-nit transparent film, 75% transparency, clean installation behind the glass. But six months in, the content was still the same three looping promotional clips the agency had delivered at launch. No daypart scheduling. No seasonal refresh. No connection to in-store promotions. Foot traffic data showed no measurable lift. The CFO wanted to know why they had spent €28,000.
The hardware was never the problem. The problem was treating a transparent LED window like a lightbox—install it, load content once, walk away. A transparent LED display is closer to a digital billboard than a poster frame: its value comes from what runs on it, when it runs, and how that connects to the commercial goals of the store behind it.
This guide covers everything that happens after you buy the screen: how to install it without ruining your storefront, what content to run and when, how to route power and data cleanly, what regulations to check, and — most importantly — how to calculate whether it was worth the money.
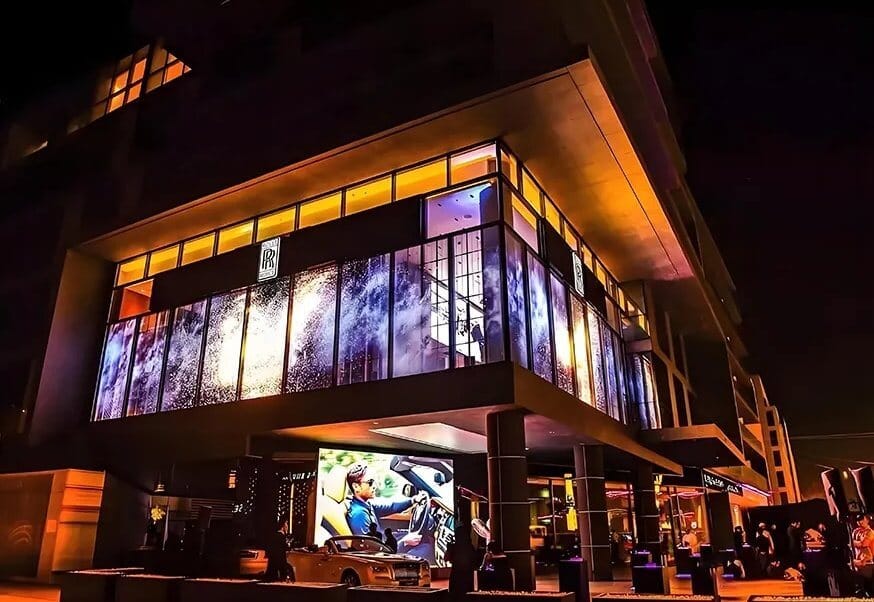
Why Retail Windows Are the #1 Application for Transparent LED Displays
Retail windows serve two masters: they must attract pedestrians from the street, and they must allow shoppers inside the store to be visible from outside. Every previous display technology forced a trade-off. A lightbox poster blocks the view inside. A projector washes out in daylight. An LCD video wall is opaque and heavy.
Transparent LED is the only format that resolves the trade-off. When content is playing, the window becomes a luminous video surface. When content pauses or runs a dark background, the window reverts to clear glass—shoppers see products inside, pedestrians see the store’s interior atmosphere.
Three market forces are driving adoption in 2026:
1. Lease restrictions on glass modification. Modern retail leases — particularly in shopping malls and heritage buildings — increasingly prohibit replacing or permanently modifying existing glass. Transparent LED film adheres to existing glass without structural changes, making it the only compliant digital display option for many locations.
2. Content production costs have collapsed. Five years ago, a 15-second motion graphic for a window display cost €2,000–5,000 from a specialist agency. In 2026, a marketing coordinator can produce the same asset in Canva Pro or Adobe Express for €0 marginal cost. When content is cheap to produce, the ROI of a dynamic display improves dramatically — the screen earns back its cost through frequent content rotation, not a single launch campaign.
3. Pedestrian attention spans have shortened. The average pedestrian glance at a storefront window is 2.5–3 seconds—down from an estimated 5–7 seconds a decade ago. Static window displays cannot communicate a message in that window. Motion video on transparent LED captures attention 3–4× longer, according to eye-tracking studies referenced by the Digital Place-Based Advertising Association.
Transparent LED vs LED Film Screen vs Holographic Fan: Which Fits Your Window?
If you have not yet selected a product type, here is the quick comparison. For a full breakdown, see our buying guide.
| Feature | Transparent LED Cabinet | LED Film Screen | LED Glass Screen | Holographic LED Fan |
| Transparency | 50–75% | 65–80% | 70–85% | 90%+ (but small area) |
| Brilho | 3,800–5,500 nits | 3,500–4,800 nits | 4,500–6,000 nits | 1,500–3,000 nits |
| Pixel pitch | P2.8–P7.8 | P5–P10 | P3.9–P10 | N/A (spinning blade) |
| Price per m² | $600–1,800 | $400–900 | $800–2,500 | $200–600 (per unit) |
| Max single-panel size | Modular, unlimited | ~3m × 2m per sheet | Custom glazing | ~0.5m diameter per fan |
| Installation | Frame or wall-mount | Adhesive to glass | Replaces glass pane | Wall or ceiling mount |
| Content type | Full video | Full video | Full video | Low-res “hologram” effect |
| Best for | Mall interiors, showrooms | Storefront windows, pop-ups | Flagship stores, auto showrooms | Trade shows, novelty displays |
| Lifespan | 100,000 hrs | 80,000–100,000 hrs | 100,000 hrs | 20,000–30,000 hrs (motor wear) |
For street-facing retail windows, LED Film Screen and Transparent LED Cabinet are the two realistic choices. LED Glass requires glass replacement (lease issue). Holographic fans are novelty items unsuitable for permanent storefront use. The decision between Film and Cabinet comes down to window size, lease terms, and pixel pitch requirements—covered in the buying guide.
This article applies to both Film and Cabinet installations. Where installation methods differ, we note it explicitly.
Window Size and Structure: How to Measure and Plan Before You Buy
Before ordering hardware, you need three measurements and one critical check.
The three measurements
1. Glazed area (visible glass). Measure the actual glass pane dimensions—not the frame-to-frame opening. Displays are specified by active display area, and you need 10–15mm of clearance from the frame edge on all sides for mounting hardware and cable routing.
2. Glass type and thickness. Single-pane: 4–6mm. Double-glazed IGU: 4-12-4 to 6-16-6 (the middle number is the air gap). Triple-glazed: rare in retail but exists in high-end showrooms. For LED film, the glass type matters because:
- Low-E coatings (common in modern retail glass) can interfere with adhesive bonding. Test a small section first or use a primer.
- Laminated glass (safety glass) has a PVB interlayer that can slightly reduce transparency when combined with LED film.
- Wire-reinforced glass (older retail buildings) creates a visible grid pattern through the film.
3. Window bay configuration. Is it a single pane, or multiple bays divided by mullions? Multi-bay windows require either:
- Individual film sheets per bay (cleaner look, but visible seams at mullions)
- Cabinet panels spanning multiple bays (requires structural bridging across mullions)
The one critical check: ventilation
Transparent LED displays generate 120–250W/m² of heat. In an enclosed window bay with no airflow—common in older retail buildings with sealed double glazing—ambient temperature inside the bay can exceed 55°C within 2 hours of continuous operation. Most transparent LED products are rated for -20°C to +50°C operating temperature. Above 50°C, thermal protection kicks in: brightness drops 15–25%, and sustained operation above 55°C shortens LED lifespan by up to 40%.
Before ordering: Measure the gap between the inner glass pane and the back of the window display (or the window reveal depth). If the gap is less than 50mm and the window receives direct sun for more than 3 hours/day, plan for active ventilation — a small extraction fan (40–60 CFM) at the top of the bay, concealed behind the fascia, with a passive intake vent at the bottom.
Installation Methods for Retail Transparent LED
Method 1: Adhesive Film Behind Glass (Most Common for Storefronts)
LED film adheres directly to the interior face of the existing glass. No structural work, no frame, no glass replacement.
Installation steps:
- Surface preparation. Clean glass with isopropyl alcohol (IPA 70%+) and lint-free cloth. Remove all residue — adhesive failure is almost always a surface preparation problem, not a product defect.
- Dry-fit alignment. Hold the film sheet against the glass with masking tape at the top edge. Confirm alignment and that the active display area clears the frame by at least 10mm on all sides.
- Peel and apply. Starting from the top, peel the release liner in 200mm sections. Use a felt-edge squeegee to press the film onto the glass, working from center outward to expel air bubbles. Work in sections of no more than 300mm vertical height at a time.
- Driver and power supply mounting. The film’s driver unit (typically 200 × 150 × 50mm per 2m² of film) mounts at the top or side of the window frame, concealed behind the fascia or in a ceiling void. Route the flat ribbon cable from the film edge to the driver along the window frame—use adhesive cable clips every 300mm.
- Power connection. Most LED film systems require 5V DC (low voltage). The transformer/driver converts mains 220V/110V to 5V DC. Ensure the transformer is rated for at least 120% of the film’s peak power draw. Install a dedicated circuit breaker for the display — do not share a circuit with store lighting or POS equipment.
Time on site: 4–6 hours for a standard 3m × 2m window (2-person team).
Reversibility: Film can be removed by peeling slowly from a corner with a heat gun at 60–80°C. Minimal adhesive residue; clean with IPA. No glass damage.
Method 2: Transparent Cabinet Behind Glass (For Higher Resolution)
Transparent LED cabinet panels are mounted on a lightweight aluminum frame set 50–100mm behind the glass. This method is used when the display requires finer pixel pitch (P2.8–P5.9) than film can achieve, or when the window is too large for a single film sheet.
Installation steps:
- Frame fabrication. A custom aluminum extrusion frame is cut to window dimensions and anchored to the window reveal (not the glass). Frame members are typically 40 × 40mm or 40 × 80mm profiles, powder-coated black or to match the store interior.
- Cabinet mounting. Transparent cabinet panels (typically 500 × 500mm or 500 × 1000mm) clip or bolt to the frame. Each cabinet weighs 8–15 kg. A 3m × 2m wall requires 12 panels (6 wide × 2 high) at 500 × 1000mm.
- Signal and power distribution. Power cables daisy-chain between cabinets along the frame. Signal cables connect to a sending card (Novastar or equivalent) mounted in a concealed location. Plan cable runs before mounting cabinets — retrofitting cables behind mounted panels is frustrating.
- Calibration. After all cabinets are mounted and powered, run the calibration sequence via the control software. This corrects brightness and color uniformity between adjacent cabinets. Allow 30–60 minutes for a 6m² installation.
Time on site: 1–2 days for a standard 3m × 2m window (2-person team including frame fabrication).
Reversibility: Frame and cabinets can be unbolted and removed. Anchor points in the window reveal may need filling/repainting.
Method 3: Suspended / Hanging (For Tall Windows and Atriums)
In tall windows (3m+ height) or shopping mall atriums, transparent cabinet panels are suspended from a ceiling-mounted rail system. This method eliminates floor-standing frames and creates a floating display effect.
Key consideration: Ceiling anchor load rating. Each cabinet panel weighs 8–15 kg; a 6m² installation (12 panels at 500 × 1000mm) can weigh 100–180 kg including frame and cabling. Confirm the ceiling structure can support 2× the total weight as a safety margin.
Method 4: Floor-Standing Frame (For Pop-Ups and Temporary Installs)
A freestanding aluminum or steel frame supports transparent cabinet panels without anchoring to walls or ceiling. Used for pop-up retail, trade show booths, and temporary seasonal installations.
Key consideration: Footprint stability. The frame must have a base footprint at least 1/3 of the display height to prevent tipping. Powder-coat the frame to match store design—a raw aluminum frame looks industrial, not retail.
Brightness and Transparency Trade-offs: 70% vs 50% vs 30% — Which Sells More?
This is the question that determines whether your window display is a revenue generator or an expensive decoration.
The core trade-off
Transparency and brightness are in tension. The more transparent a display, the fewer LED chips per square meter, and the lower the maximum brightness. Conversely, denser LED arrays (lower transparency) produce brighter, sharper images but reduce the see-through effect.
Three configuration profiles
Profile A: High Transparency (75–85%) — “Invisible When Off”
- Pixel pitch: P7.8–P10
- Brightness: 3,500–4,500 nits
- Visual effect: Display is nearly invisible when off; subtle when on. Customers can see products through the display at all times.
- Best for: Luxury retail, jewellery, watch stores where the product behind the glass IS the primary attraction
- Content approach: Minimal, elegant, dark backgrounds with single-element animations. Brand logos, slow product rotations, seasonal color washes.
- Trade-off: Low pixel density limits content to bold graphics and simple animations. Fine text and detailed product imagery are not readable.
Profile B: Balanced (65–75%) — “Display + See-Through”
- Pixel pitch: P5–P7.8
- Brightness: 4,000–5,500 nits
- Visual effect: Display is clearly visible when on but still allows reasonable see-through. The window functions as both advertising medium and product showcase.
- Best for: Fashion, consumer electronics, department stores, chain restaurants — the majority of retail applications
- Content approach: Full motion video, promotional messaging, seasonal campaigns. Moderate text is readable. Product visuals work but should be bold, not detailed.
- Trade-off: The “best of both worlds” profile, but requires careful content design to balance advertising impact with transparency.
Profile C: Low Transparency (50–65%) — “Display Dominant”
- Pixel pitch: P2.8–P5
- Brightness: 4,500–6,000 nits
- Visual effect: Display dominates the window when on. See-through is significantly reduced. When content runs, the window is effectively a video wall.
- Best for: Flagship campaign launches, automotive showroom reveals, immersive brand experiences where the content IS the product
- Content approach: Full-resolution video content — product films, campaign videos, spec loops. Fine text and detailed imagery are readable.
- Trade-off: Loses the transparency advantage. If the display runs content 100% of the time, the store interior is not visible from outside. Use scheduled “transparency windows” (see Day vs Night section below).
Which profile sells more?
There is no universal answer—but there is a framework:
| Your Store Type | Recommended Profile | Why |
| Luxury (jewellery, watches) | A (75–85%) | Product must always be visible. Display enhances, never replaces. |
| Fashion (apparel, footwear) | B (65–75%) | Campaign content + product visibility. Balanced approach. |
| Consumer electronics | B–C (60–75%) | Product specs and demos benefit from higher resolution. |
| Automotive showroom | C (50–65%) | Vehicle reveal content is the primary attraction. |
| Chain restaurant/café | B (65–75%) | Menu content + interior atmosphere. Daypart scheduling essential. |
| Department store | B (65–75%) | Multiple brand windows, varied content. |
| Pop-up / temporary | A–B (70–80%) | Lower cost, easy installation, broad-applicable content. |
Content Strategy: What to Show on a Transparent LED Storefront
The single biggest factor determining whether a transparent LED window delivers ROI is not the hardware — it is the content strategy. The footwear chain in our opening story had excellent hardware and zero content strategy. Here is what a working content strategy looks like.
The three content layers
Layer 1: Ambient (60–70% of runtime)
Background motion graphics that create atmosphere without demanding attention. Slow gradient shifts, particle effects, brand color washes, abstract patterns. The display is “alive” but not intrusive. This is what runs when no specific promotion is active.
- Duration per asset: 15–30 seconds, looped
- Brightness: 50–60% of max (reduces heat, extends lifespan)
- Design rule: Dark backgrounds (black, dark navy, dark brand color). White or bright backgrounds kill the transparency effect.
Layer 2: Promotional (25–35% of runtime)
Time-sensitive content tied to specific campaigns, sales, or product launches. Product imagery, promotional pricing, call-to-action messaging. This is what drives footfall conversion.
- Duration per asset: 10–15 seconds, rotated with Layer 1
- Brightness: 70–85% of max
- Design rule: Single message per asset. Do not cram three promotions into one 15-second clip. One product, one offer, one CTA.
Layer 3: Real-time / Interactive (5–10% of runtime)
Live data or interactive content: countdown timers to product launches, social media feeds (#hashtag display), weather-reactive content (showing rain boots when it rains), or QR code interactions. This layer creates urgency and engagement.
- Duration: Variable
- Brightness: 80–100% of max
- Design rule: Keep it simple. QR codes must be large enough to scan from 2–3 meters (minimum 200 × 200mm at P7.8).
What to avoid
- White or bright backgrounds. On a transparent display, white content fills the gaps between LEDs, destroying the see-through effect. The display becomes an opaque white panel. Always design with dark backgrounds.
- Small text below 30px equivalent. At P7.8, text smaller than approximately 30px at 1080p resolution is unreadable from 3 meters. If the message needs small text, it is the wrong medium.
- Static images. A static image on a transparent LED display looks like a broken screen. Even a slow animation (a 30-second gradient cycle) is better than a still image.
- TV commercials. Broadcast video content is designed for 16:9 opaque screens at viewing distances of 2–3 meters. Transparent LED displays have different aspect ratios, lower resolution, and are viewed at 2–5 meters through glass. Content must be designed for the medium.
Day vs Night: How Content Should Change Based on Lighting Conditions
A transparent LED window display that runs the same content at 2pm and 10pm is leaving 30–40% of its potential impact on the table.
Daytime (sunlight hours)
- Challenge: Ambient sunlight is 10,000–100,000 lux. Even a 5,000-nit display competes poorly with direct sun.
- Strategy: Maximize brightness (85–100%). Favor high-contrast content—white or bright text on dark backgrounds, bold geometric shapes, single-color animations. Avoid detailed product imagery that will wash out.
- Transparency priority: High. During the day, the see-through effect is valuable—pedestrians can see products inside the store, which is itself an advertisement.
- Content example: A fashion retailer runs a slow-motion model walk on a dark background at 70% opacity. The display is visible, but the store interior—mannequins, product displays—is also visible through the film.
Nighttime (after dusk)
- Challenge: Ambient light drops to 50–500 lux. The display is now the brightest object in the street. It dominates attention completely.
- Strategy: Reduce brightness to 50–60% — the display is already brighter than everything around it. Full brightness at night is wasteful (increases heat, shortens lifespan) and can be visually overwhelming.
- Transparency priority: Low. At night, the store interior is dark (or artificially lit). The see-through effect is less valuable—there is less to see. Shift to higher-opacity, full-resolution content.
- Content example: The same fashion retailer switches to a full-bleed campaign video—product close-ups, brand story films, seasonal lookbook. The display is now a video wall, not a transparent layer.
Implementation: Daypart scheduling
Most transparent LED controllers (Novastar TB series, Brompton, Colorlight) support time-based playlist scheduling. Set up at minimum two dayparts:
| Time Block | Brilho | Content Layer | Transparency Mode |
| 06:00–10:00 (morning) | 70% | Ambient + breakfast promo (F&B) | High transparency |
| 10:00–17:00 (daytime) | 85–100% | Ambient + promotional rotation | Balanced |
| 17:00–21:00 (evening) | 60% | Full promotional + campaign video | Low transparency (display dominant) |
| 21:00–06:00 (night) | 40% or off | Ambient only (or off to save power) | N/A |
This schedule should be adjusted seasonally — in winter, nighttime content starts at 16:00; in summer, at 19:30.
Power and Data: Running Cables Through a Retail Window
The aesthetic challenge of transparent LED installation is not the display—it is the cables. A transparent display with visible power and signal cables running across the window frame defeats the purpose.
Power routing
Requirement: Most transparent LED systems require low-voltage DC power (5V for film, 5V or 12V for cabinet). The AC-to-DC transformer/driver must be concealed.
Best practice:
- Locate the transformer in the ceiling void or behind the window fascia — not on the floor of the window bay (visible from outside) or inside the store (tripping hazard, aesthetic issue).
- Route DC power cables along the window frame edge, secured with adhesive cable clips every 300mm. Use flat ribbon cables for film installations (they are only 2–3mm thick and adhere directly to the glass edge).
- Install a dedicated circuit breaker for the display. Do not share a circuit with store lighting, POS systems, or refrigeration. A transparent LED display drawing 200W/m² on a shared circuit can cause voltage drops that reset POS terminals or dim store lighting.
- Plan for surge protection. Retail window displays are connected to building mains that may experience voltage spikes (HVAC cycling, refrigeration compressor starts). Install a surge protector (Type 2, 20kA) on the display circuit.
Data routing and content delivery
Requirement: The display needs a video signal source. Options:
| Method | How It Works | Best For | Latency |
| USB / SD card | Content files loaded onto a media player (Android box or dedicated player) connected directly to the display via HDMI/DVI | Single-store, infrequent content updates | N/A (local playback) |
| LAN / Ethernet | Media player connected to store network; content pushed via local CMS | Multi-display stores, scheduled updates | <100ms |
| Cloud CMS (4G/WiFi) | Display controller connects to cloud-based CMS (Novastar VNNOX, BrightSign Network, Scala) via WiFi or 4G SIM | Multi-location chains, centralized management | 1–5s (not real-time, but fine for scheduled content) |
| Real-time data feed | Live data (weather, social media, stock prices) fed via API to the media player | Interactive/real-time content | <1s |
Best practice for cable concealment:
- Film installations: The flat ribbon cable from the film edge to the driver is thin enough (2–3mm) to be concealed behind the window frame’s existing rubber gasket. If no gasket exists, use a thin black adhesive cable channel (5 × 3mm) painted to match the frame.
- Cabinet installations: Signal and power cables run inside the aluminum frame extrusion. Most transparent LED frame profiles have a built-in cable channel—use it. Do not run cables exposed across the back of the display.
- The “invisible install” standard: From 3 meters outside the window, no cables should be visible. If you can see a cable, so can your customers.
Local Regulations: Permits, Brightness Limits, and Safety Codes
Transparent LED window displays sit at the intersection of signage regulation, building codes, and electrical safety standards. The specific requirements vary by jurisdiction, but here is what to check before installation.
Signage permits
| Region | Typical Regulation | Action Required |
| EU (most members) | Illuminated signage in commercial windows requires notification or permit from local planning authority | Check with municipal planning office; provide spec sheet (brightness, dimensions, installation method) |
| UK | Advertisement Consent required for illuminated signs in most commercial zones; conservation areas have stricter rules | Apply via local council planning portal; allow 8 weeks for approval |
| USA | Local zoning ordinances govern illuminated signage; varies by city and zone (commercial, mixed-use, historic) | Check municipal zoning code; may require sign permit and electrical permit |
| Middle East (UAE, KSA) | Municipal signage permits required; content may be subject to cultural review | Work with local contractor familiar with municipal process |
| Southeast Asia (SG, MY, TH) | Building management/mall operator approval typically required before municipal permit | Get landlord/building approval first, then apply for municipal permit |
Brightness limits
Many jurisdictions impose maximum brightness limits on illuminated window signage to prevent light pollution and driver distraction:
- EU recommended limit: 300 cd/m² (nits) above ambient for window-facing signage in residential-adjacent commercial zones. In practice, this is rarely enforced for transparent LED in pure commercial zones, but check locally.
- UK (Illusory Illumination): Some councils restrict “moving” or “animated” content in window displays after certain hours. Daypart scheduling (see above) can address this—run ambient/static content during restricted hours.
- USA: Varies widely. New York City limits illuminated window signs to 350 candela/m² in residential districts; commercial districts are less restrictive. Los Angeles requires a permit for any internally illuminated window sign.
Practical tip: Most transparent LED controllers support brightness scheduling. Set the display to automatically reduce to 300–500 nits during evening hours to comply with most nighttime brightness restrictions, then increase to full brightness during daylight hours.
Electrical safety
- EU: CE marking (LVD 2014/35/EU + EMC 2014/30/EU) required for all electrical display equipment. Ensure your supplier provides CE-compliant products with valid documentation.
- USA: UL listing (UL 60065 for audio/video equipment) may be required by local electrical inspectors. FCC Part 15 compliance required for any wireless-equipped controller.
- All regions: Low-voltage DC power (5V/12V) for the display itself is generally not subject to high-voltage electrical permits, but the AC-to-DC transformer and mains wiring must comply with local electrical codes. Use a licensed electrician for mains connection.
ROI Calculation: How to Measure Foot Traffic, Engagement, and Sales Lift
This is the section most suppliers skip. Without an ROI framework, your transparent LED window is a capital expense with no measurable return — and that makes it the first thing cut in the next budget review.
The ROI formula
Payback Period (months) = Total Investment ÷ Monthly Incremental Revenue
Where:
- Total Investment = Display hardware + installation + content production (first year) + CMS subscription (annual)
- Monthly Incremental Revenue = (Incremental foot traffic × conversion rate × average transaction value) + advertising revenue (if applicable)
Step 1: Measure incremental foot traffic
You cannot calculate ROI without a baseline. Before installation, measure foot traffic past your store for at least 4 weeks using:
- Door counter (people counter): Infrared or thermal sensor at store entrance. Records entries per hour.
- Window dwell time: Camera-based analytics (e.g., retail analytics platforms like RetailNext, Dor) that measure how long pedestrians pause at the window before entering or walking past.
After installation, measure the same metrics for 4–8 weeks. Compare:
| Metric | Before LED | After LED (4 weeks) | Change |
| Daily foot traffic past store | 2,400 | 2,400 | — (same pedestrian flow) |
| Window pause rate (% who stop) | 3.2% | 8.7% | +172% |
| Store entry conversion (of those who pause) | 18% | 24% | +33% |
| Daily store entries from window | 2,400 × 3.2% × 18% = 14 | 2,400 × 8.7% × 24% = 50 | +257% |
Example figures for a street-facing fashion store in a mid-tier European shopping district.
Step 2: Calculate incremental revenue
Using the example above:
- Incremental daily entries: 50 − 14 = 36
- Average transaction value (ATV): €85
- Conversion rate (entry to purchase): 28% (industry average for fashion retail)
- Daily incremental revenue: 36 × 28% × €85 = €857
- Monthly incremental revenue (26 operating days): €22,282
Step 3: Calculate payback period
Investment:
- LED film display (6m² at €550/m²): €3,300
- Installation labor: €1,200
- Content production (first year, 12 monthly refreshes at €300 each): €3,600
- CMS subscription (annual): €480
- Total Year 1 investment: €8,580
Payback: €8,580 ÷ €22,282/month = 0.39 months (approximately 12 days)
Reality check: when ROI doesn’t look this good
The example above represents a best-case scenario—a street-facing fashion store in a high-footfall area with strong content execution. Real-world ROI varies dramatically:
| Factor | High ROI Scenario | Low ROI Scenario |
| Location | Street-facing, 2,000+ daily pedestrians | Mall interior, 500 daily passers-by |
| Content strategy | Fresh content monthly, daypart scheduling | Same 3 clips for 6 months |
| Window size | 4m²+ of display area | 1.5m² (too small to make impact) |
| Product type | Fashion, F&B (impulse purchase) | B2B services, high-consideration purchase |
| Baseline conversion | Low window pause rate before LED (room to improve) | Already strong window display (LED adds marginal lift) |
| Typical payback | 1–3 months | 12–24 months or never |
The single biggest ROI killer is content stagnation. A display running the same content for more than 4 weeks sees a 40–60% drop in window pause rate as pedestrians tune it out. Budget for monthly content refresh—it is not optional.
Real Numbers: 3 Retail Transparent LED Case Studies
Case Study 1: Footwear Chain — Street-Facing Flagship (Milan, Italy)
| Parâmetro | Value |
| Store type | Mid-tier footwear brand, street-facing flagship |
| Display | Transparent LED film, 4.2m², P7.8, 4,800 nits |
| Investment | €4,800 (hardware + installation + first year content) |
| Baseline daily entries | 120 |
| Post-install daily entries (8-week average) | 178 |
| Incremental entries/day | +58 |
| ATV | €72 |
| Purchase conversion | 26% |
| Monthly incremental revenue | 58 × 26% × €72 × 26 days = €28,140 |
| Payback period | Under 1 week |
Key success factor: The brand produced new content every 2 weeks tied to product launches. Daypart scheduling ran ambient content during morning hours and full campaign video in evening hours.
Case Study 2: Cosmetics Brand — Shopping Mall Atrium (Dubai, UAE)
| Parâmetro | Value |
| Store type | Premium cosmetics, mall atrium-facing |
| Display | Transparent LED cabinet, 8m², P5.9, 5,200 nits |
| Investment | AED 52,000 (~$14,150 USD, hardware + installation + first year content) |
| Baseline daily entries | 340 |
| Post-install daily entries (12-week average) | 385 |
| Incremental entries/day | +45 |
| ATV | AED 240 (~$65 USD) |
| Purchase conversion | 31% |
| Monthly incremental revenue | 45 × 31% × AED 240 × 30 days = AED 100,440 (~$27,350 USD) |
| Payback period | ~16 days |
Key success factor: The display faced a mall atrium with high footfall but low window pause rate. The transparent LED created a “halo effect” — the display was visible from 15+ meters away, drawing pedestrians toward the store. Content was seasonal campaign video synced with the brand’s social media calendar.
Case Study 3: Chain Restaurant — Street-Facing (Bangkok, Thailand)
| Parâmetro | Value |
| Store type | Quick-service restaurant, street-facing |
| Display | Transparent LED film, 3m², P10, 4,000 nits |
| Investment | ฿95,000 (~$2,650 USD, hardware + installation) |
| Content strategy | Daypart menu scheduling: breakfast (06:00–11:00), lunch (11:00–15:00), dinner (15:00–22:00) |
| Baseline daily entries | 180 |
| Post-install daily entries (6-week average) | 215 |
| Incremental entries/day | +35 |
| ATV | ฿180 (~$5 USD) |
| Purchase conversion | 95% (nearly all who enter purchase) |
| Monthly incremental revenue | 35 × 95% × ฿180 × 30 days = ฿179,550 (~$5,000 USD) |
| Payback period | ~19 days |
Key success factor: Daypart content scheduling. The display showed animated breakfast menu items in the morning, switched to lunch specials at 11:00, and dinner promotions at 15:00. The content matched what customers could order at that moment — creating immediate purchase intent.
Common Mistakes: Why Some Retail LED Windows Fail to Deliver Results
Mistake 1: Content Stagnation
What happens: The display launches with fresh campaign content. Three months later, it is still running the same three clips. Pedestrians who walk past the store daily have seen the content dozens of times and no longer look.
The fix: Budget for monthly content refresh at minimum. Assign content responsibility to a specific team member. Use a content calendar synced with your marketing campaign schedule.
Mistake 2: Specifying Brightness for the Showroom, Not the Street
What happens: The display looked perfect in the supplier’s demo room (controlled lighting, 500 lux). Installed in a south-facing street window (50,000+ lux), the content is invisible during daytime hours.
The fix: Always specify brightness based on installation context, not demo room conditions. Minimum 4,500 nits for any window-facing application. Request a site test — a 500 × 500mm sample panel installed in the actual window for 24 hours.
Mistake 3: Ignoring Thermal Management
What happens: The display is installed in a sealed window bay with no ventilation. After 2 hours of operation, the bay temperature exceeds 50°C. The display’s thermal protection kicks in and brightness drops 20%. After 6 months, LED degradation is visible — the top of the display (hottest area) is noticeably dimmer than the bottom.
The fix: Measure window bay temperature before and after installation. If the temperature exceeds 45°C during operation, install a ventilation fan (40–60 CFM extraction at the top of the bay, passive intake at the bottom).
Mistake 4: No CMS / Content Management Plan
What happens: The display ships with a USB media player. Content is loaded manually by a store employee who has other priorities. After the launch campaign, nobody updates the content for months.
The fix: Specify a cloud-based CMS (Novastar VNNOX, BrightSign, or equivalent) at the time of purchase. The CMS allows centralized content management, scheduling, and monitoring from a web browser—the marketing team can update content for all store locations from one dashboard.
Mistake 5: Too Much Text
What happens: The marketing team designs content using the same approach as a print poster—paragraphs of product description, multiple call-to-action messages, fine print terms and conditions. On a P7.8 transparent display viewed from 3 meters, none of it is readable.
The fix: One message per 10–15 second clip. Maximum 5–7 words of text. Font size: minimum 30px equivalent at 1080p. If the message requires more text, it is the wrong medium—use a printed poster next to the display.
Mistake 6: No Measurement Baseline
What happens: The display is installed. Nobody measured foot traffic before installation. Six months later, the CFO asks “did this work?” and nobody can answer. The display is cut from the next budget.
The fix: Install a door counter and window dwell-time camera at least 4 weeks before the LED display goes live. Establish a baseline. Measure for 4–8 weeks post-installation. Report the numbers.
Mistake 7: Choosing the Cheapest Supplier Without Checking Certifications
What happens: A supplier offers transparent LED film at 40% below market price. The product arrives without CE/FCC documentation. The local electrical inspector refuses to sign off on the installation. The store cannot open with the display operational until certified replacement hardware is sourced—a 6-week delay.
The fix: Require CE (LVD + EMC) for EU, FCC + UL for USA, and RoHS for all markets. Request the actual certification documents, not a supplier’s verbal assurance. Legitimate suppliers provide these documents as standard practice.
Maintenance in a Retail Environment: Cleaning, Content Updates, and Seasonal Campaigns
Transparent LED displays are low-maintenance compared to traditional LED screens (no individual lamp replacement for film types), but they are not zero-maintenance.
Cleaning
| Component | Frequency | Method |
| Display surface (film) | Monthly | Microfiber cloth + IPA 30% solution. Spray cloth, not display. |
| Display surface (cabinet) | Monthly | Soft brush to remove dust from LED faces. Compressed air for module gaps. |
| Glass behind display | Quarterly | Clean from inside the store. Do not spray cleaning solution toward the display. |
| Driver unit/power supply | Quarterly | Visual inspection. Check for heat discoloration. Clean dust from vents. |
| Cables and connections | Bi-annually | Visual inspection. Check for loose connectors, cable wear. |
Do not use: Ammonia-based glass cleaners (degrade LED film adhesive over time), abrasive cloths (scratch LED surface), or high-pressure water (force moisture into cabinet seams).
Content updates
| Update Type | Frequency | Owner | Method |
| Promotional content | Monthly minimum | Marketing team | Cloud CMS upload |
| Seasonal campaign | Quarterly | Marketing team | CMS playlist scheduling |
| Daypart schedule | Seasonal adjustment (4×/year) | Store manager | CMS time-based rules |
| Emergency content (store closure, special event) | As needed | Store manager | CMS remote override |
| Content library audit | Quarterly | Marketing team | Review all running content; remove stale assets |
Seasonal maintenance checklist
- Spring: Check for winter condensation damage (common in sealed window bays). Inspect cable insulation for cold-weather cracking.
- Summer: Monitor window bay temperature. If thermal throttling occurs, install or upgrade ventilation fan.
- Autumn: Clean display surface thoroughly before holiday season (highest-traffic period). Update content to holiday campaigns.
- Winter: Verify display operates correctly at low temperatures. Most transparent LED is rated to -20°C, but cold-start brightness may be reduced for the first 5–10 minutes.
Eyecatchmedia Transparent LED Solutions: Designed for Retail Windows That Work 24/7
Eyecatchmedia manufactures transparent LED displays across all four product categories, with a focus on retail window applications:
| Product Series | Type | Pixel Pitch | Transparency | Brilho | Best Application |
| ECM-TF Series | LED Film Screen | P5 / P7.8 / P10 | 65–80% | 3,500–4,800 nits | Storefront windows, pop-ups, leasehold retail |
| ECM-TG Series | LED Glass Screen | P3.9 / P5.9 / P7.8 | 70–82% | 4,500–6,000 nits | Flagship retail, auto showroom |
| ECM-TC Series | Transparent Cabinet | P3.9 / P5.9 / P7.8 | 55–72% | 3,800–5,500 nits | Mall interiors, showroom floor |
| ECM-TM Series | LED Mesh Curtain | P16 / P25 / P31.25 | 88–93% | 4,000–5,500 nits | Building facade, large atrium |
What we include with every retail window order:
- Complete installation guide with site-specific cable routing diagram
- Cloud CMS pre-configured for daypart scheduling
- 12-month content template library (seasonal campaigns, daypart playlists, ambient loops)
- CE (LVD + EMC), RoHS, FCC documentation included
- Spare module kit (5% of order quantity) shipped with every order
- Remote technical support via WhatsApp/WeChat/Email
Standard certifications: CE (LVD + EMC), RoHS 3, FCC Part 15 Lead time: 18–25 working days standard; 30–35 days for custom sizes Minimum order: 1 screen (no MOQ for standard sizes) Warranty: 2 years parts and labor; 3-year extended warranty available
FAQ: Transparent LED for Retail Windows
Q: How long does transparent LED film last on a retail window?
Rated LED lifespan is 80,000–100,000 hours at standard operating conditions (50% brightness, 25°C ambient). At 12 hours per day, 7 days a week, that is approximately 18–22 years of continuous operation. In practice, the power supply components typically need attention at the 5–8 year mark, and visible brightness degradation (10–15% reduction) is measurable after 7–10 years. Film adhesive typically lasts 7–10 years before requiring reapplication.
Q: Can I install transparent LED film myself, or do I need a professional installer?
For windows under 2m², a careful DIY installation is possible—the process is similar to applying large-format vehicle wrap film. For windows over 2m², professional installation is strongly recommended. Air bubbles, misalignment, and adhesive contamination are the most common DIY failures, and they are expensive to fix (the film must be removed and discarded). Eyecatchmedia provides installation guides and can recommend certified installers in most major markets.
Q: How do I know if my window glass is suitable for LED film?
Three checks: (1) Is the glass flat and smooth? Curved or textured glass is not suitable for standard film. (2) Does the glass have a low-E coating? Low-E coatings can reduce adhesive bond strength—test with a small film sample first. (3) Is the glass single or double-glazed? Double-glazed (IGU) windows are fine — film adheres to the inner pane—but check that the window bay has ventilation to prevent heat buildup.
Q: What content management system should I use?
For single-store installations, a basic Android media player with USB playback is sufficient. For multi-location retail chains, a cloud-based CMS is essential. We recommend Novastar VNNOX (free with Novastar controllers), BrightSign Network (subscription-based, enterprise-grade), or Scala (for large-scale digital signage networks). Ensure your CMS supports time-based playlist scheduling for daypart content management.
Q: Will the display be visible during daytime in direct sunlight?
At 4,500+ nits, yes — but with caveats. Direct sunlight on the glass creates reflected glare that competes with the display. Anti-reflective (AR) glass coating helps significantly. If the window receives direct sun for more than 4 hours/day, specify 5,000+ nits and design daytime content with high contrast (bright elements on dark backgrounds). Profile A (high transparency) displays are harder to read in direct sun than Profile C (low transparency, high brightness) displays.
Q: Can transparent LED film be removed and reinstalled at a different location?
No. Once film is removed from glass, it cannot be reapplied—the adhesive is single-use. If you anticipate relocating the display (pop-up retail, seasonal installations), use transparent LED cabinet panels instead. Cabinets are modular, unbolt, and can be reinstalled at a new location with a new frame.
Q: How much does a complete retail transparent LED installation cost?
For a standard street-facing retail window (3m × 2m = 6m²), a complete LED film installation typically costs 3,000–5,500 (hardware + installation). A transparent cabinet installation for the same size costs 5,000–12,000. Add 500–2,000 for content production (first year) and 200–500/year for CMS subscription. See our buying guide for detailed pricing by product type.
Ready to plan your retail window transparent LED installation? Contact Eyecatchmedia for a free site assessment, custom quote, and rendered visualisation of your window configuration—we respond within 24 hours.